Ignore them now, and you’ll pay for it in July.
At the start of the year, most back gardens look as though nothing is happening. The soil can feel set like concrete, trees and shrubs appear inert, and the tools often stay tucked away in the shed. But in that quiet spell, raspberries are already edging towards either a strong season or a disappointing one-depending on what’s left standing in the row.
The deceptive calm of winter: what your raspberry canes are really telling you
From the kitchen window in January, a raspberry bed can look like nothing more than a messy bundle of sticks: no leaves, no blossom and no obvious urgency. That stillness is exactly what causes many gardeners to miss the signal that determines whether the plants surge in spring or limp along.
In winter, the clue doesn’t come from foliage (it dropped months ago). It comes from the raspberry canes themselves-their colour, their feel and how intact their surface is. In the same clump you’ll usually find two very different types of cane:
- young, vigorous canes that are building strength for growth and fruit later in the year
- spent, exhausted canes that have already finished their job and are beginning to break down
From a distance they can look much alike. Up close, they’re telling you completely different things.
The key January signal: dull, cracked, grey-brown raspberry canes that look weary and brittle rather than smooth and richly coloured.
Those tired, peeling canes aren’t just untidy. They hold dampness around the crown, cast shade where airflow should be, and provide an easy starting point for fungal problems at a time when the plant’s natural defences are at their weakest.
Reading the wood: how to spot dead canes versus next summer’s fruit
Raspberries work to a two-year cycle. In year one, canes known as primocanes mainly put on growth and structure. In year two, those canes become floricanes and carry most of the crop. After fruiting, they are effectively finished. If you leave that old wood in place, it steals space, light and resources from the younger canes that should be setting you up for the coming season.
Gardeners in both the UK and North America often confess to the same pattern: they planned to “sort the raspberries later”, then spring arrived and everything shot up at once. By then, the knock-on effects-crowding, damp and disease-are already in motion.
Simple field test: three clues on every cane
You don’t need any specialist kit to assess a raspberry plant. A brief check usually makes it obvious which stems to keep and which to remove.
- Colour: Living canes commonly show a greenish or reddish tint beneath the surface and look comparatively smooth and fresh. Dead or spent canes turn flat brown to ash-grey and often look faded or dusty.
- Flexibility: Gently bend the tip. A live cane has some give and will spring back slightly; a dead cane breaks sharply, like dried spaghetti.
- Bark condition: On finished stems, bark often loosens, peels and flakes away in strips, leaving a rough, neglected texture.
If a cane is grey, brittle and shedding bark, assume it’s finished wood-not future fruit.
This takes only minutes, but it influences the plant’s health for months. It’s less about “neatening up” and more like hygiene: you’re removing weak material that can harbour disease and suppress new growth.
Cutting back to move forward: the January clean-out for raspberries
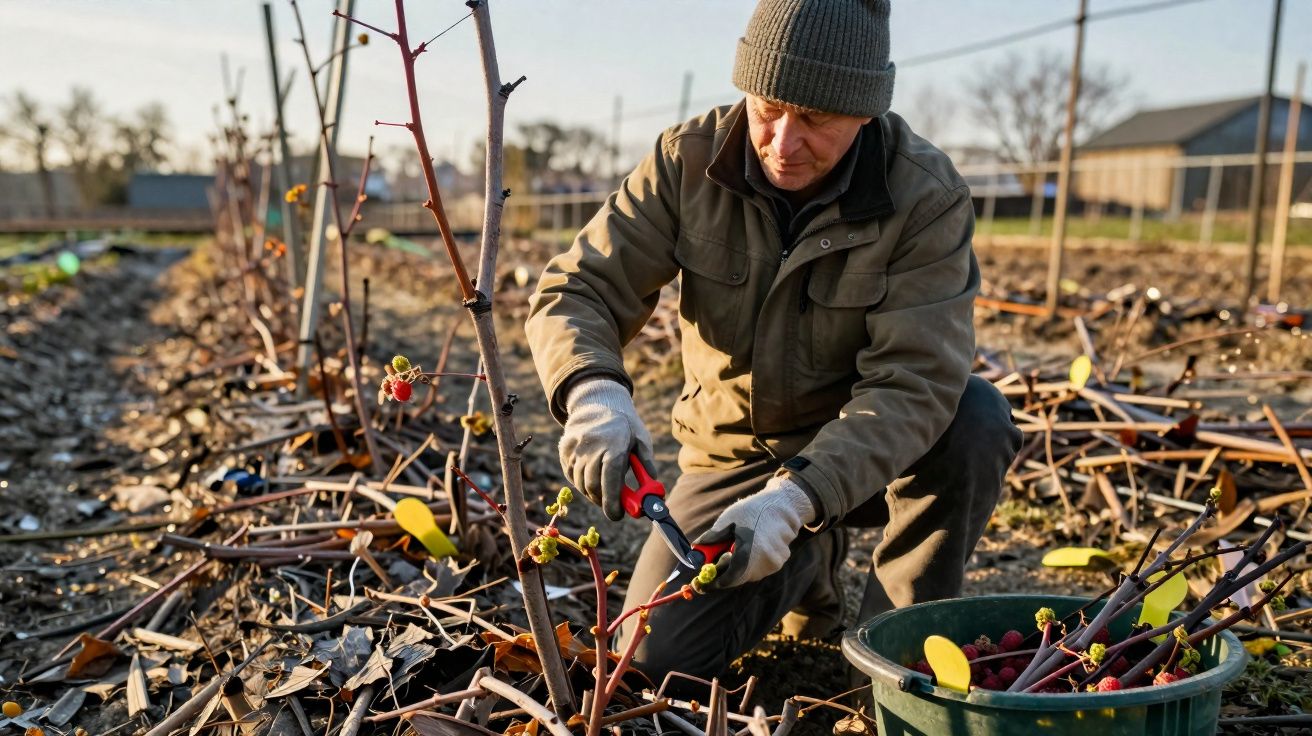
Once you’ve picked out the dead and spent canes, the timing matters. Cold, dry winter days give you a valuable window: sap flow is low, and fungal spread is typically slower than it will be later. That’s why growers who depend on raspberries treat January as prime time for a decisive clear-out with secateurs.
Step-by-step: how professionals clear a raspberry row
This straightforward approach is commonly used in managed berry rows and commercial plantings.
- Sharpen and disinfect your secateurs (methylated spirits works well, or a diluted bleach solution).
- Identify and mark canes that fruited last season or are clearly dead.
- Cut those canes at ground level, as close to the base as you can safely manage.
- Thin the remaining live canes by removing any that are broken, crossing, or rubbing, so the centre of the clump stays open.
- Remove and bag up the cuttings, especially if you suspect disease-don’t leave them in a heap beside the row.
Aim for a bright, airy clump with space between the remaining canes, rather than a solid thicket.
Make each cut clean and low. Stubs left 5–10 cm high often split, soften and become ideal entry points for fungi and cane borers.
Added hygiene step (worth doing): if you’ve had issues such as cane blight or spur blight before, disinfect your blades again between plants and dispose of suspect canes with garden waste rather than composting them. It’s a small extra effort that can reduce reinfection later in the year.
Different timing for summer-bearing and autumn-bearing (everbearing) raspberries
Raspberry types don’t all need the same January approach. What you grow determines what you remove.
| Type | Typical fruiting | January action |
|---|---|---|
| Summer-bearing | One main crop in early to mid-summer | Remove all canes that fruited last summer right down to the base; keep strong one-year canes. |
| Autumn-bearing (everbearing) | Main crop from late summer into autumn | Either cut all canes to the ground for one later crop, or only remove canes that fruited heavily. |
Many home gardeners prefer the “cut everything down” method for autumn-bearing (everbearing) varieties because it’s simple and reliable. The trade-off is that the first berries usually arrive a little later.
Why this winter sacrifice boosts yield later
Hard winter pruning can look ruthless: you take out wood, the patch looks smaller, and the row can seem almost stripped bare. In practice, the plant often responds as though it has been given breathing space.
Through winter, raspberry roots hold a limited store of carbohydrates. As temperatures rise, that stored energy has to be allocated. If the clump is dominated by dead canes, the plant wastes resources supporting failing tissue while shading the shoots that should be taking over.
Pruning dead canes in January directs the plant’s limited reserves into buds that can actually flower and fruit.
Removing the spent stems pushes that energy towards two important outcomes:
- stronger buds and bigger berries on the healthy canes you keep
- more vigorous new shoots from the base, which become next year’s fruiting wood
It can also help in dry spells. With fewer unproductive stems demanding water and nutrients, the root system can support active growth more efficiently when conditions are hot or rainfall is scarce.
Finishing touches: protect the base before temperatures rise
After pruning, a raspberry row can look stark. More soil is visible, and each crown is suddenly more exposed to wind and cold. That’s your cue to add a protective layer.
Spread a generous mulch around the plants, but don’t pile it directly against the canes. Suitable materials include:
- shredded prunings from healthy wood
- well-rotted garden compost
- chipped bark or untreated wood chips
- dry leaves mixed with a little soil or compost to keep them from blowing away
Mulch helps to steady temperature swings, retain moisture in the root zone and suppress early weeds that compete with spring growth. As it breaks down, it feeds soil organisms, improving structure and drainage-conditions raspberries particularly appreciate in rich, slightly moist, well-aerated ground.
Added growing note: raspberries tend to perform best in soil that isn’t waterlogged and isn’t highly alkaline. If your plants have been struggling, consider checking drainage and doing a simple soil test; correcting compaction and improving organic matter often makes more difference than extra feeding.
Hidden risks when you ignore the January signal
Skipping winter work doesn’t only reduce your crop; it quietly changes the whole microclimate in the fruit patch. Where growth is dense and tangled, humidity lingers around the base-especially during the mild, wet winters that have become increasingly common in parts of the UK.
That persistent damp encourages issues such as cane blight, spur blight and other fungal diseases, which may not show clearly until months later as dead patches on canes and poor fruit set. When symptoms finally become obvious in June or July, infection may already be established around the crown.
Unpruned rows can also be a nuisance to pick. You’re more likely to tread on new shoots, snap tender canes while reaching for hidden fruit, and damage the very wood that should crop next year. A short session of January pruning often saves hours of frustration in summer.
Taking it further: spacing, supports and succession planting for raspberries
Once you get used to reading winter signals, it’s natural to manage raspberries more deliberately-less like a casual hedge and more like a productive crop.
Canes secured to horizontal wires or simple posts stay upright, dry faster after rain and tend to carry fruit more evenly along their length. Thinning to a consistent number of canes per metre of row helps each cane reach its potential without excessive internal competition.
Many gardeners also extend the season by planting a sequence of varieties along a fence: early summer-fruiting types, then mid-season, followed by autumn-fruiting raspberries. With correct winter pruning and regular renewal, that combination can stretch picking from early summer right through to the first frosts.
Raspberries also sit well beside other deciduous soft fruits that need similar winter attention, such as blackcurrants and gooseberries. The same January indicators-dead wood, crowded centres and poor airflow-apply across them. Once you learn to interpret one plant’s structure, you start noticing quiet warning signs throughout the garden long before they show up as a lost harvest.

Comments
No comments yet. Be the first to comment!
Leave a Comment